When you notice missing shingles on your roof, it’s more than just an eyesore—it’s a serious threat to your home’s structural integrity. Storm damage and wear over time can leave your roof vulnerable to water infiltration, leading to costly interior damage and potential safety hazards.
Acting quickly when you discover missing shingles can save you thousands of dollars in repairs down the road. Whether you’re dealing with a few loose shingles after a storm or noticing gradual deterioration, understanding how to properly inspect and address these issues is crucial for every homeowner.
This blog post will cover:
- Why missing shingles pose serious risks to your home
- A detailed 7-step process for inspection and repair
- When to call professional roofers versus DIY solutions
- Preventive measures to protect your roof long-term
🏠 Why Missing Shingles Is a Critical Home Maintenance Issue

Missing shingles create immediate vulnerabilities that can escalate into major problems if left unaddressed. Your roof system depends on complete coverage to function properly, and even small gaps can have significant consequences.
When shingles are missing, your roof’s underlayment becomes exposed to the elements. This protective barrier wasn’t designed to withstand direct sunlight, rain, and temperature fluctuations for extended periods.
Key risks of missing shingles include:
- Water damage to your home’s interior structure
- Mold and mildew growth in attic spaces
- Increased energy costs due to compromised insulation
- Potential for complete roof system failure
- Decreased property value and insurance complications
🔍 7 Steps to Inspect & Repair Your Shingle Roof
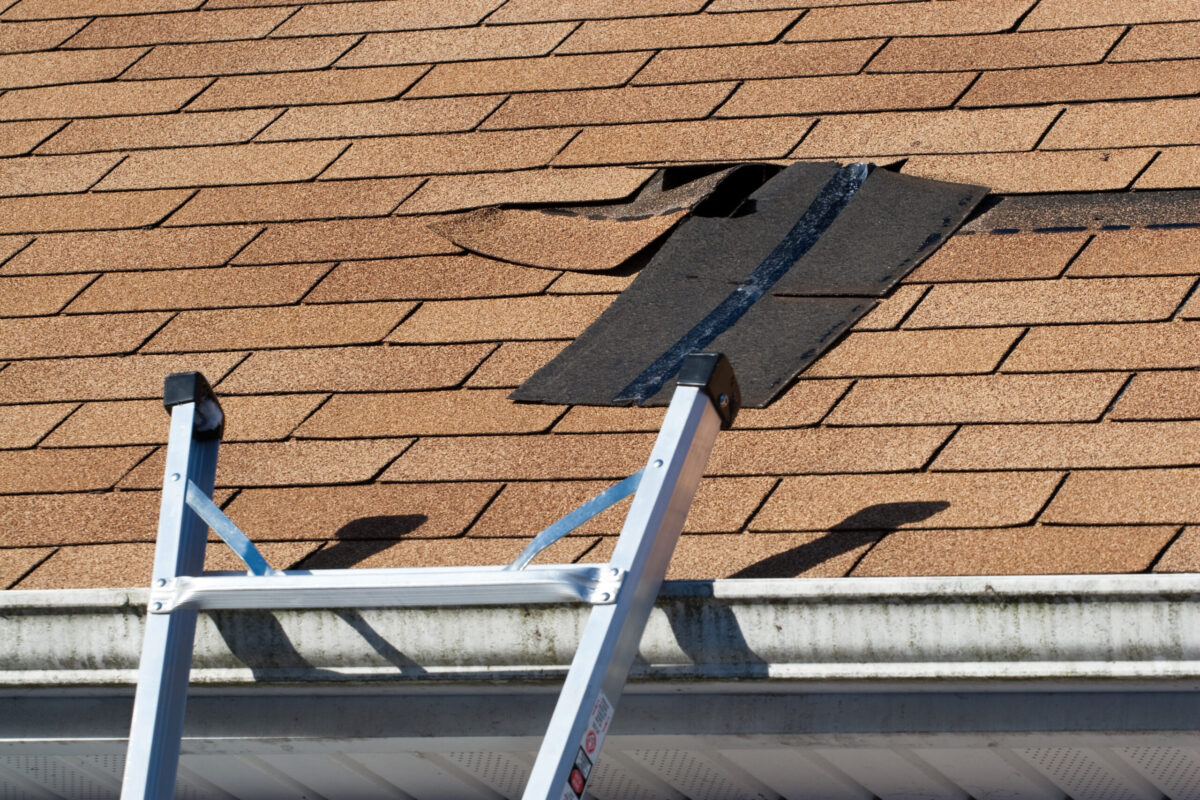
Addressing missing shingles requires a systematic approach that prioritizes safety while ensuring thorough repairs. Following these steps will help you assess the damage and determine the best course of action for your specific situation.
1. Conduct a Safe Ground-Level Inspection
Start your roof assessment safely from the ground using tools like binoculars or a camera with a telephoto lens. This allows you to identify potential damage without putting yourself at risk. Focus on finding visible issues such as missing shingles, curled edges, or anything hanging out of place. A thorough ground-level inspection helps you plan your next steps efficiently.
- Walk around the entire perimeter of your home to ensure all roof sections are visible.
- Take multiple photos from different angles to document damage. These will be helpful for insurance claims or when consulting with a roofing professional.
- Note any debris, sagging areas, or signs of wear that could indicate a larger problem.
2. Check Your Attic for Interior Signs
The attic often reveals roof damage invisible from the outside. Inspecting this space can help you pinpoint leaks, structural issues, or areas where shingles may be missing. Water stains, wet insulation, and sunlight peeking through the roof deck are key indicators of damage.
- Use a flashlight to carefully examine the underside of your roof deck for any signs of water intrusion or gaps.
- Look for water stains on rafters, ceiling joists, or insulation, which can signal leaks.
- Inspect the attic during or after rainfall to identify active leaks or areas where water is seeping in.
3. Gather Necessary Tools and Safety Equipment
Before you start any hands-on roof repair, make sure you have the right tools and safety gear. Roofing work is inherently dangerous, so prioritizing safety is crucial to avoid accidents or injuries. Proper preparation ensures a smoother repair process.
- Essential safety gear: Wear non-slip, rubber-soled shoes for better traction. Use a safety harness with a secure anchor point, and stabilize your ladder with ladder stabilizers to prevent tipping.
- Required tools: Gather a hammer, roofing nails, a utility knife for cutting shingles, replacement shingles that match your existing ones, and a roofing shovel or pry bar for removing old materials.
- Double-check the condition of your tools before use to ensure they’re in good working order.
4. Carefully Access Your Roof
If you need to access the roof, do so with extreme caution. Only proceed if you have experience working at heights and the proper equipment to do so safely. Avoid attempting roof repairs in bad weather, as wet or windy conditions can increase the risk of accidents.
- Use a sturdy extension ladder and place it at a safe angle (a 4-to-1 ratio is recommended). Ensure the ladder is on a stable surface and securely positioned.
- Always have someone on the ground to spot you and assist in case of an emergency.
- Avoid carrying too much equipment up the ladder; use a toolbelt or hoist items up once you’re safely on the roof.
5. Remove Damaged Shingle Remnants
Removing the remnants of damaged shingles is a delicate process. Take care not to damage surrounding shingles or other roofing materials as you work. Proper removal ensures the new shingles will adhere securely.
- Gently lift the surrounding shingles with a pry bar or flat tool to expose the nails holding the damaged shingle in place.
- Remove the nails completely, pulling them out carefully to prevent further damage to the roof.
- Clear the area of debris, dirt, or old adhesive to create a clean surface for the new shingles.
6. Install Replacement Shingles Properly
When installing new shingles, it’s important to match the color, texture, and style of your existing roof to maintain a uniform appearance. Proper alignment and nail placement are critical for ensuring the shingles stay in place and your roof remains watertight.
- Align the new shingles with the existing row patterns so they blend seamlessly with the rest of the roof.
- Nail the shingles in place following the manufacturer’s specifications for nail placement and quantity. Be sure to drive nails securely but not so tightly that they damage the shingle.
- Trim any excess material from the new shingles to ensure a clean, professional finish.
7. Seal and Inspect Your Work
Once the new shingles are in place, sealing and inspecting your repair ensures long-lasting results. Roofing cement can help secure edges and prevent water from seeping underneath the shingles. A thorough final inspection will give you peace of mind that the repair is complete.
- Apply a thin, even layer of roofing cement under the edges of the new shingles to seal them in place and protect against wind or water damage.
- Conduct a detailed inspection of the repaired area to ensure all shingles are lying flat and that nails are properly driven.
- Pour water over the repaired section to simulate rainfall and confirm that it flows correctly off the roof without pooling or leaking.
⚠️ When to Call Professional Roofers

While minor shingle repairs can sometimes be handled by experienced homeowners, many situations require professional expertise. Recognizing when to call experts can prevent injuries and ensure quality repairs that protect your investment.
Contact professional roofers when you encounter:
- Extensive damage: Multiple missing shingles across large roof areas
- Steep roof slopes: Roofs with pitches that create dangerous working conditions
- Structural concerns: Sagging areas or damaged roof deck material
- Insurance claims: Professional documentation helps maximize claim settlements
Professional roofers bring specialized knowledge about local building codes, manufacturer warranties, and proper installation techniques. They also carry insurance that protects you from liability in case of accidents.
Benefits of professional repair services:
- Quality guarantee: Established contractors warranty their work
- Safety assurance: Trained professionals use proper safety protocols
- Code compliance: Experts ensure repairs meet local building requirements
- Material access: Professionals can source exact shingle matches more easily
📞 Protect Your Home with Expert Roofing Services
Missing shingles demand immediate attention to prevent costly damage to your home’s interior and structure. While this guide provides valuable information for understanding the repair process, the complexity and safety risks involved often make professional service the wisest choice.
Don’t let missing shingles compromise your family’s safety and comfort. Our experienced team at K&D Roofing has helped countless homeowners throughout the Raleigh area protect their most valuable investment with quality repairs and replacements.
Schedule your free roof inspection today and let our GAF Master Elite certified professionals assess your roof’s condition and provide expert solutions tailored to your specific needs.