
Metal roofing has gained popularity for its durability, efficiency, and long-term value. Whether you’re building a new home or upgrading an old roof, understanding how to install metal roofing properly is key to avoiding future leaks, energy loss, or structural issues. Homeowners in Chapel Hill, NC and surrounding areas often ask what goes into the installation process—because while metal roofs are strong, poor installation can compromise their benefits. Taking the time to follow the correct steps can mean the difference between a 50-year roof and one that fails early.
As with any home improvement project, you’ll want to make sure the job is done right—from prep to fasteners to finishing touches. For homeowners who want year-round protection, combining your roofing project with regular inspections is one of the best ways to stay ahead of costly repairs.
In this guide, you’ll learn:
- The biggest benefits of installing metal roofing on your home
- A step-by-step breakdown of the installation process
- Pro tips for avoiding common DIY mistakes
- How different materials and panel types affect your project
- When it’s best to hire a professional for the job
Why So Many Homeowners Are Switching to Metal Roofing

Metal roofing isn’t just a trend—it’s a smart long-term investment. In places like Chapel Hill and surrounding areas where hot summers, strong winds, and occasional hail are common, homeowners are realizing just how valuable this material can be.
- Incredible Longevity: Most metal roofs last between 40 and 70 years with proper care—more than double the lifespan of asphalt shingles.
- Energy Efficiency: Metal reflects solar radiant heat, reducing cooling costs by up to 25% during peak summer months.
- Low Maintenance: Unlike other materials, metal doesn’t crack, curl, or require constant patching.
- Fire and Weather Resistance: Metal is non-combustible and stands up better to extreme winds and hail than many traditional roofing options.
- Curb Appeal and Value: Standing seam and other styles offer sleek finishes that can increase home value and resale interest.
Installing a metal roof is a great way to protect your property while adding a modern, stylish touch.
7 Steps To Install Metal Roofing on Your Home
Installing a metal roof isn’t a task for the faint of heart, but with the right preparation, it’s doable. This step-by-step breakdown gives you a clear look at how the process unfolds—from prep work to finishing details.
1. Measure the Roof and Order Materials
Before doing anything, you’ll need precise measurements.
- Measure each slope of the roof including length, width, and pitch
- Add 10% to your total square footage to account for waste and cuts
- Choose your material (aluminum, steel, copper, zinc) and panel type (corrugated, ribbed, standing seam)
Ordering pre-cut panels ensures the most accurate fit for your layout.
2. Remove the Old Roofing (Optional, But Recommended)
Though metal can sometimes be installed over existing shingles, removing the old roof gives you the cleanest and safest foundation.
- Inspect for damaged sheathing, rot, or moisture
- Repair any soft spots before continuing
- Clean debris and old nails thoroughly
Skipping this step can lead to trapped moisture or hidden leaks down the line.
3. Install the Underlayment
Underlayment adds an important layer of water resistance under the metal panels.
- Use synthetic or felt underlayment, rated for metal roofing
- Start at the eaves and roll upward, overlapping each layer by 4 inches
- Secure with cap nails or roofing staples, especially around valleys and hips
Some installers add a second water barrier (like ice and water shield) in cold or storm-prone regions.
4. Install Furring Strips or Purlins (If Needed)
This step depends on your roof structure and the type of metal panels being used.
- Furring strips improve airflow under panels and reduce thermal transfer
- Space strips evenly, following the manufacturer’s guidelines
- Secure to rafters using corrosion-resistant fasteners
Not every metal roof requires this step, but it adds durability and insulation in many applications.
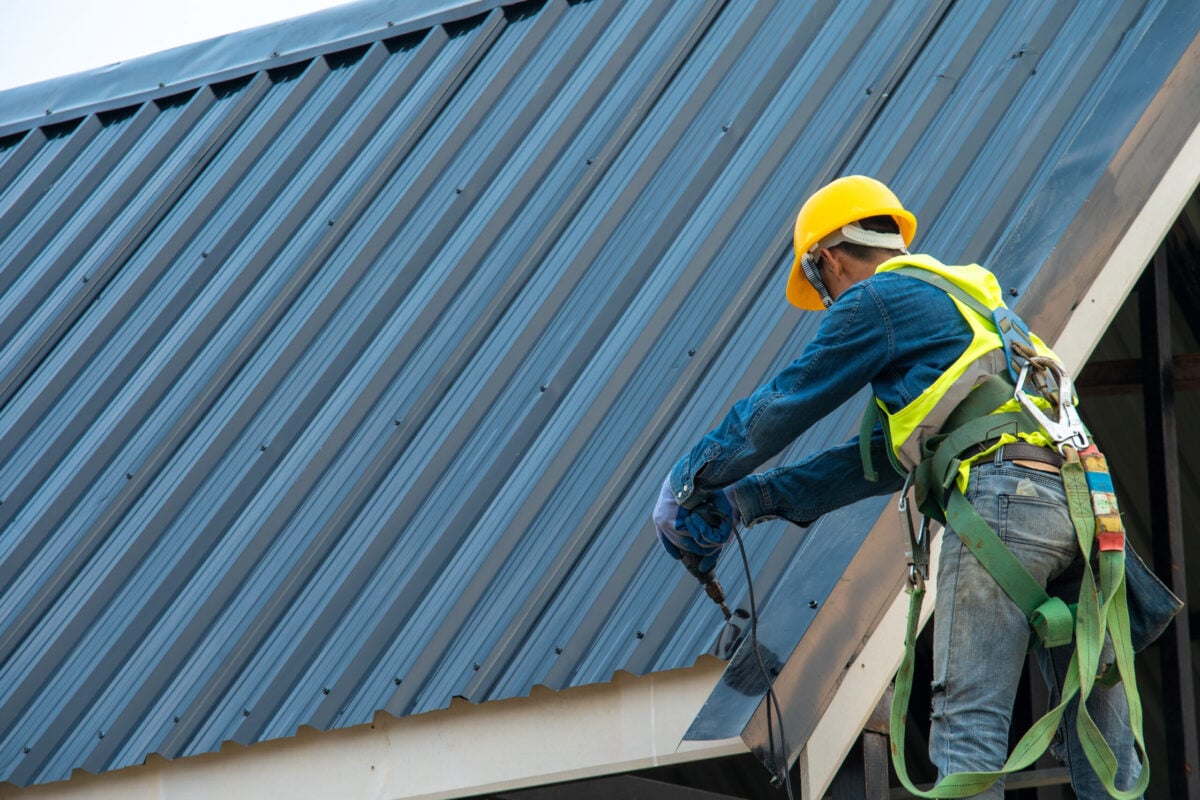
5. Install Metal Panels
Now comes the most visible part of the job—placing the panels.
- Start at one corner, usually at the edge of a gable or eave
- Align panels with care, ensuring consistent overhang (1–2 inches at eaves)
- Fasten panels with screws in the flat of the panel, not the ridge, using rubber washer screws
- Overlap each panel according to manufacturer specs, often by one full ridge or rib
Be consistent with spacing and check alignment every few rows.
6. Flash Roof Features and Install Trim
Vents, chimneys, skylights, and valleys require special attention.
- Use metal flashing that’s compatible with your panel system
- Apply butyl tape or sealant under flashing for watertight coverage
- Install drip edge trim, ridge caps, and gable trim last to complete the roof’s edges
These components not only protect against water but also give the roof a finished look.
7. Final Inspection and Cleanup
Once all panels and trim are in place:
- Check for loose screws or gaps
- Ensure no metal shavings or cuttings are left behind—they can rust and stain the roof
- Use a magnetic roller to pick up fasteners or tools left in the grass
Doing a full walk-through now will save you headaches later.
Additional Tips to Improve Your Metal Roof Installation

Even small choices during installation can impact your roof’s performance. Here are some expert tips to enhance the process and results.
Choose the Right Panel System
- Corrugated panels are budget-friendly but less watertight
- Ribbed panels offer strength with basic overlap installation
- Standing seam systems provide sleek looks and better water shedding
Chapel Hill homeowners often prefer standing seam systems for their modern appearance and minimal maintenance.
Use the Right Fasteners
- Always use galvanized or stainless steel screws with rubber washers
- Screws should be long enough to penetrate framing or furring
- Avoid overdriving screws—it can crack washers or deform the panels
A poor fastener job is one of the top reasons metal roofs fail early.
Don’t Skip the Sealant
Sealant may seem optional, but it adds a strong layer of protection—especially around flashing and exposed seams.
- Butyl tape is the most common sealant used for metal
- Apply under trim and flashing before installing screws
- Replace old or dried sealant during future inspections
Plan for Expansion and Contraction
Metal expands and contracts with temperature. To prevent buckling:
- Follow panel spacing instructions carefully
- Avoid overly tight fasteners
- Use sliding clips for standing seam systems
Proper spacing keeps your roof quiet and secure during hot Chapel Hill summers and cool winter nights.
Metal Roofing Cost and Material Comparison
Choosing the right metal roofing system means balancing cost, appearance, and performance. Here’s a breakdown of common materials:
| Material | Cost per Sq. Ft. | Lifespan | Maintenance | Appearance |
| Galvanized Steel | $3 – $5 | 40–50 years | Low | Traditional/Ribbed |
| Aluminum | $4 – $6 | 50+ years | Low | Coastal Friendly |
| Copper | $9 – $14 | 70+ years | Minimal | Distinctive Patina |
| Zinc | $6 – $10 | 60–80 years | Very Low | Sleek/Architectural |
For Chapel Hill and surrounding areas, aluminum is often preferred for its balance of performance and resistance to coastal moisture.
Is DIY Worth It? When to Hire a Professional
Metal roofing installation takes more than just good intentions—it requires precision. Here’s when it might be better to call in the pros.
Hire a Professional If:
- Your roof has complex valleys, dormers, or angles
- You’re working with standing seam or interlocking panels
- You’re replacing more than 1,500 square feet
- Local codes require permits or inspections
DIY Might Be Okay If:
- Your roof is small and simple (like a shed or porch)
- You have prior roofing or construction experience
- You’re working with corrugated panels over a flat deck
Even if you’re experienced, hiring a pro ensures long-term performance and warranty protection. Licensed contractors in Chapel Hill and surrounding areas are also more familiar with local weather conditions and building codes.
Ready to Start Your Metal Roof Project?
Installing a metal roof isn’t just about better curb appeal—it’s about getting a longer-lasting, safer, and more energy-efficient system over your head. If you’re planning a project in Chapel Hill or surrounding areas, knowing each step helps you ask better questions, choose smarter materials, and avoid shortcuts that lead to problems later. Whether you’re considering a DIY install or looking to work with experienced professionals, the right preparation goes a long way in making the most of your investment.
If you’d like expert guidance or a professional evaluation for your home, contact us today and let K&D Roofing help you make the most of your metal roofing project from start to finish.